Подготовка окружения#
В данном разделе описан сценарий подготовки окружения для установки DropApp с помощью утилиты Dactl.
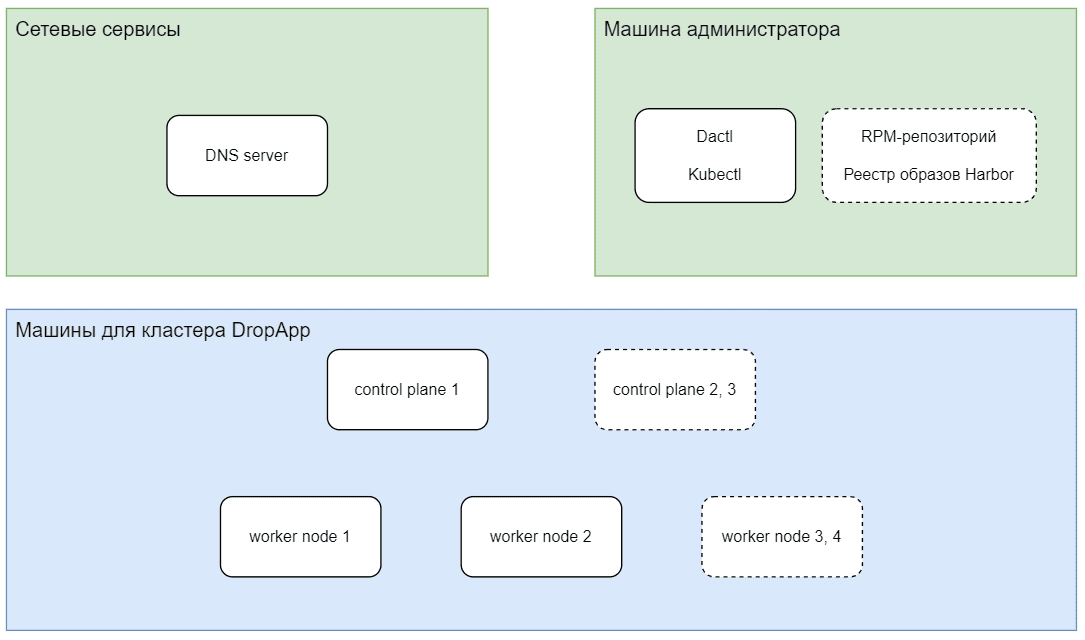
Общая схема развертывания представлена на диаграмме:
Порядок подготовки к установке:
Предварительные условия#
Примечание
В данной инструкции приведен пример установки реестра образов Harbor и RPM-репозитория на машину администратора
Планирование пула IP-адресов#
DropApp использует балансировщик Metallb для развертывания приложений.
Для использования Metallb зарезервируйте диапазон IP-адресов. Например, 10 адресов из той же подсети, в которой развернуты серверы для установки DropApp.
DNS#
Зарегистрируйте в DNS записи для приложений. Формат записей hostname: <tool>.<clusteName>.<domain>. Примеры указаны в таблице ниже.
Приложение |
Пример записи |
IP-адрес |
|---|---|---|
Console |
|
Первый из пула адресов для Metallb |
Dex |
|
Первый из пула адресов для Metallb |
Другие сервисы |
|
Первый из пула адресов для Metallb |
Control plane кластера |
|
Адреса машин для control plane |
Worker nodes кластера |
|
Адреса машин для worker nodes |
Реестр |
|
Адрес реестра |
Имена должны разрешаться c nodes кластера.
Машина администратора#
DropApp настраивается администратором на виртуальной машине с предустановленной ОС.
Для установки требуется машина администратора кластера с которой будет запускаться утилита Dactl.
Машина администратора кластера должна быть в одном сетевом контуре с:
будущими nodes кластера;
image registry (реестром образов), куда будут загружены образы контейнеров DropApp;
RPM-репозиторием.
Загрузка дистрибутивов из личного кабинета#
Примечание
Дальнейшие действия выполняются из каталога /root.
Загрузите следующие дистрибутивы продукта и компонента Управляющий слой из Личного Кабинета клиента:
архив продукта:
K8S-<version>-<distrib_number>-distrib.zip;архив управляющего слоя:
K8S-mgmt-<version>-<distrib_number>-distrib.zip.
Распаковка дистрибутивов#
Важно
Архив продукта имеет большой размер - более 10 Гб, рекомендуется перед разархивацией установить переменную окружения UNZIP_DISABLE_ZIPBOMB_DETECTION=TRUE с помощью команды:
export UNZIP_DISABLE_ZIPBOMB_DETECTION=TRUE
Для получения вложенных архивов и файлов:
Разархивируйте из архива
K8S-<version>-<distrib_number>-distrib.zipвложенный архивK8S-k8sc-<version>-<distrib_number>-distrib.zip:unzip K8S-<version>-<distrib_number>-distrib.zipРазархивируйте из архива
K8S-k8sc-<version>-<distrib_number>-distrib.zipвложенные архивы с образами и RPM-пакетами дистрибутива:unzip K8S-k8sc-<version>-<distrib_number>-distrib.zipРазархивируйте архивы с образами и RPM-пакетами:
unzip k8sc-images-<version>-<distrib_number>-distrib.zip -d images
unzip k8sc-rpms-<version>-<distrib_number>-distrib.zip -d rpms
unzip rpms/K8S-k8sc-rpms-<version>-<distrib_number>-SBEL9-distrib.zip -d rpms/rpms-sbel9
unzip rpms/K8S-k8sc-rpms-<version>-<distrib_number>-SBEL8-distrib.zip -d rpms/rpms-sbel8
Разархивируйте архив с утилитой Dactl:
unzip K8S-mgmt-<version>-<distrib_number>-distrib.zip -d mgmtРазархивируйте образы и бинарный файл
dactl:unzip ./mgmt/mgmt-binaries-<version>-<distrib_number>-distrib.zip -d ./dactl unzip ./dactl/package/bh/dactl-<version>.zip -d ./dactl/ unzip ./mgmt/mgmt-images-<version>-<distrib_number>-distrib.zip -d ./images-mgmtПроверьте версию Dactl:
./dactl/dactl versionПример вывода:
Platform V DropApp version: <version>
Подготовка артефактов DropApp#
Примечание
При наличии реестра образов и RPM-репозитория перейдите к разделу Загрузка образов DropApp в реестр.
Подготовка артефактов включает в себя создание реестра образов для контейнеров и RPM-репозитория. Шаги инструкции, приведенной ниже, выполняются последовательно.
Создание реестра образов#
Для установки DropApp необходим реестр образов контейнеров Harbor. В данном разделе описан процесс создания реестра образов .
Предварительные условия для установки реестра образов#
Для установки реестра образов Harbor необходимо выполнить предварительные условия:
установлен Podman-Compose;
dnf install python3-pip -y
pip3 install podman-compose
отключен
selinux:setenforce 0Примечание
Для постоянного отключения SElinux необходимо отредактировать конфигурационный файл
selinux:vi /etc/selinux/configSELINUX=permissiveприсутствует доступ в интернет;
Машина администратора, для которой должны быть выполнены следующие условия:
у пользователя в системе должны быть административные полномочия (root или аналогичные);
машина должна быть в одном сетевом контуре с будущими nodes кластера;
на машине должны быть установлены Docker или Podman.
Дистрибутив
K8S-<version>-<distrib_number>-distrib.zip;DNS-запись вида
registry.da-cluster.<public_domain>с адресом текущей машины.
Примечание
Инструмент Podman входит в состав продукта OC Platform V SberLinux OS Server (далее – SberLinux).
Минимальная конфигурация машины для реестра образов и RPM-репозитория приведена в таблице.
Значение |
Размер |
|---|---|
ЦПУ [CPU] (в ядрах) |
4 (с поддержкой VT*) |
ОЗУ [RAM] |
8192 Мб |
Размер диска [HDD/SSD] |
150 Гб |
Генерация сертификатов для реестра образов#
В качестве доверенных сертификатов можно использовать уже имеющиеся в системе. Если их нет, то создайте для реестра самоподписные сертификаты, следуя сценарию ниже:
Создайте каталог
harborи перейдите в него.Создайте в каталоге
harborскриптharbor_certs.sh.harbor_certs.sh
#!/bin/bash
set -e

# Парсинг аргументов
while [[ "$#" -gt 0 ]]; do
    case $1 in
        --ip) IP="$2"; shift ;;
        --hostname) HOSTNAME="$2"; shift ;;
        --passphrase) PASSPHRASE="$2"; shift ;;
        --container-engine) CONTAINER_ENGINE="$2"; shift ;;
        *) echo "Unknown parameter passed: $1"; exit 1 ;;
    esac
    shift
done

# Если IP не передан, используйте первый IP из вывода hostname -I
if [ -z "$IP" ]; then
    IP=$(hostname -I | awk '{print $1}')
fi

# Если HOSTNAME не передан, используйте текущий hostname
if [ -z "$HOSTNAME" ]; then
    HOSTNAME=$(hostname)
fi

if [ -z "$CONTAINER_ENGINE" ]; then
    CONTAINER_ENGINE="podman"
fi

# Создайте директорию certs, если она существует, удалите ее
if [ -d "./certs" ]; then
    rm -rf ./certs
fi
mkdir ./certs

# Генерация корневого ключа и сертификата
openssl genrsa -out ./certs/harbor_internal_ca.key 4096
if [ -z "$PASSPHRASE" ]; then
    openssl req -x509 -new -nodes -key ./certs/harbor_internal_ca.key -sha512 -days 3650 -out ./certs/harbor_internal_ca.crt -subj "/C=RU/L=Moscow/O=Platform V DropApp/CN=dropapp_internal_ca"
else
    openssl req -x509 -new -key ./certs/harbor_internal_ca.key -sha512 -days 3650 -out ./certs/harbor_internal_ca.crt -subj "/C=RU/L=Moscow/O=Platform V DropApp/CN=dropapp_internal_ca" -passin pass:"$PASSPHRASE"
fi

# Генерация ключа для сертификата приложения
openssl genrsa -out ./certs/harbor.key 4096

# Создание конфигурационного файла для расширений сертификата
cat > ./certs/v3.ext <<-EOF
authorityKeyIdentifier=keyid,issuer
basicConstraints=CA:FALSE
keyUsage = digitalSignature, nonRepudiation, keyEncipherment, dataEncipherment
subjectAltName = @alt_names

[alt_names]
IP.1 = $IP
DNS.1 = $HOSTNAME
DNS.2 = portal
DNS.3 = core
DNS.4 = registry
DNS.5 = job_service
DNS.6 = trivy_adapter
DNS.7 = harbor_db
DNS.8 = redis
DNS.9 = registryctl
DNS.8 = proxy
EOF

# Генерация CSR для сертификата приложения
openssl req -new -key ./certs/harbor.key -out ./certs/harbor.csr -subj "/C=RU/L=Moscow/O=Platform V DropApp/CN=$HOSTNAME"

# Подписание сертификата приложения корневым сертификатом
if [ -z "$PASSPHRASE" ]; then
    openssl x509 -req -in ./certs/harbor.csr -CA ./certs/harbor_internal_ca.crt -CAkey ./certs/harbor_internal_ca.key -CAcreateserial -out ./certs/harbor.crt -days 3650 -sha512 -extfile ./certs/v3.ext
else
    openssl x509 -req -in ./certs/harbor.csr -CA ./certs/harbor_internal_ca.crt -CAkey ./certs/harbor_internal_ca.key -CAcreateserial -out ./certs/harbor.crt -days 3650 -sha512 -extfile ./certs/v3.ext -passin pass:"$PASSPHRASE"
fi

for NAME in portal core registry job_service trivy_adapter harbor_db redis proxy registryctl; do
    cp ./certs/harbor.crt "./certs/${NAME}.crt"
    cp ./certs/harbor.key "./certs/${NAME}.key"
done

echo "Сертификаты успешно созданы в директории ./certs"

echo "Скопируйте harbor.crt в директорию /etc/containers/certs.d/$HOSTNAME"
sudo rm -rf /etc/containers/certs.d/$HOSTNAME
sudo mkdir -p /etc/containers/certs.d/$HOSTNAME
sudo cp ./certs/harbor.crt /etc/containers/certs.d/$HOSTNAME/ca.crt

# Условие для container-engine
if [[ "$CONTAINER_ENGINE" == "docker" ]]; then
    echo "Скопируйте harbor.crt в директорию /etc/docker/certs.d/$HOSTNAME"
    sudo rm -rf /etc/docker/certs.d/$HOSTNAME
    sudo mkdir -p /etc/docker/certs.d/$HOSTNAME
    sudo cp ./certs/harbor.crt /etc/docker/certs.d/$HOSTNAME/ca.crt
    sudo systemctl restart docker
fi

if [[ "$CONTAINER_ENGINE" == "podman" ]]; then
    sudo systemctl restart podman
fi
Параметры скрипта, используемые в команде, приведены в разделе ниже.
Сделайте файл исполняемым:
chmod +x harbor_certs.shЗапустите скрипт, он сгенерирует самоподписанные сертификаты для реестра и расположит их в каталоге
certs.dдляcontainer runtime:./harbor_certs.sh --hostname registry.da-cluster.domain.ru --container-engine <docker|podman>
Параметры скрипта#
Параметры скрипта harbor_certs.sh:
--ip- опциональный параметр, по умолчанию равен выводуhostname -I, то есть публичному IP текущей машины;--hostname- обязательный параметр, сертификат будет выписан на этот hostname;--passphrase- опциональный параметр для пароля сертификата;--container-engine- опциональный параметр, можно передатьdockerилиpodman, по умолчаниюpodman.
Важно
Для создаваемого реестра образов должна быть DNS запись.
Установка реестра образов#
Для установки реестра образов выполните:
Создайте в каталоге
harborфайлharbor.yml:harbor.yml
# Configuration file of Harbor

# The IP address or hostname to access admin UI and registry service.
# DO NOT use localhost or 127.0.0.1, because Harbor needs to be accessed by external clients.
hostname: harbor.bootstrap.domain.ru

# http related config
http:
  # port for http, default is 80. If https enabled, this port will redirect to https port
#  port: 80

# https related config
https:
  # https port for harbor, default is 443
  port: 443
  # The path of cert and key files for nginx
  certificate: /home/user/harbor/certs/harbor.crt
  private_key: /home/user/harbor/certs/harbor.key

# # Uncomment following will enable tls communication between all harbor components
#internal_tls:
#   # set enabled to true means internal tls is enabled
#  enabled: true
#   # put your cert and key files on dir
#  dir: /root/harbor/certs
#   # enable strong ssl ciphers (default: false)
#   strong_ssl_ciphers: false

# Uncomment external_url if you want to enable external proxy
# And when it enabled the hostname will no longer used
# external_url: https://reg.mydomain.com:8433

# The initial password of Harbor admin
# It only works in first time to install harbor
# Remember Change the admin password from UI after launching Harbor.
harbor_admin_password: <harbor-admin-password>

# Harbor DB configuration
database:
  # The password for the root user of Harbor DB. Change this before any production use.
  password: root123
  # The maximum number of connections in the idle connection pool. If it <=0, no idle connections are retained.
  max_idle_conns: 100
  # The maximum number of open connections to the database. If it <= 0, then there is no limit on the number of open connections.
  # Note: the default number of connections is 1024 for postgres of harbor.
  max_open_conns: 900
  # The maximum amount of time a connection may be reused. Expired connections may be closed lazily before reuse. If it <= 0, connections are not closed due to a connection's age.
  # The value is a duration string. A duration string is a possibly signed sequence of decimal numbers, each with optional fraction and a unit suffix, such as "300ms", "-1.5h" or "2h45m". Valid time units are "ns", "us" (or "µs"), "ms", "s", "m", "h".
  conn_max_lifetime: 5m
  # The maximum amount of time a connection may be idle. Expired connections may be closed lazily before reuse. If it <= 0, connections are not closed due to a connection's idle time.
  # The value is a duration string. A duration string is a possibly signed sequence of decimal numbers, each with optional fraction and a unit suffix, such as "300ms", "-1.5h" or "2h45m". Valid time units are "ns", "us" (or "µs"), "ms", "s", "m", "h".
  conn_max_idle_time: 0

# The default data volume
data_volume: ./data_harbor

# Harbor Storage settings by default is using /data dir on local filesystem
# Uncomment storage_service setting If you want to using external storage
# storage_service:
#   # ca_bundle is the path to the custom root ca certificate, which will be injected into the truststore
#   # of registry's containers.  This is usually needed when the user hosts a internal storage with self signed certificate.
#   ca_bundle:

#   # storage backend, default is filesystem, options include filesystem, azure, gcs, s3, swift and oss
#   # for more info about this configuration please refer https://docs.docker.com/registry/configuration/
#   filesystem:
#     maxthreads: 100
#   # set disable to true when you want to disable registry redirect
#   redirect:
#     disable: false

# Trivy configuration
#
# Trivy DB contains vulnerability information from NVD, Red Hat, and many other upstream vulnerability databases.
# It is downloaded by Trivy from the GitHub release page https://github.com/aquasecurity/trivy-db/releases and cached
# in the local file system. In addition, the database contains the update timestamp so Trivy can detect whether it
# should download a newer version from the Internet or use the cached one. Currently, the database is updated every
# 12 hours and published as a new release to GitHub.
trivy:
  # ignoreUnfixed The flag to display only fixed vulnerabilities
  ignore_unfixed: false
  # skipUpdate The flag to enable or disable Trivy DB downloads from GitHub
  #
  # You might want to enable this flag in test or CI/CD environments to avoid GitHub rate limiting issues.
  # If the flag is enabled you have to download the `trivy-offline.tar.gz` archive manually, extract `trivy.db` and
  # `metadata.json` files and mount them in the `/home/scanner/.cache/trivy/db` path.
  skip_update: false
  #
  # skipJavaDBUpdate If the flag is enabled you have to manually download the `trivy-java.db` file and mount it in the
  # `/home/scanner/.cache/trivy/java-db/trivy-java.db` path
  skip_java_db_update: false
  #
  # The offline_scan option prevents Trivy from sending API requests to identify dependencies.
  # Scanning JAR files and pom.xml may require Internet access for better detection, but this option tries to avoid it.
  # For example, the offline mode will not try to resolve transitive dependencies in pom.xml when the dependency doesn't
  # exist in the local repositories. It means a number of detected vulnerabilities might be fewer in offline mode.
  # It would work if all the dependencies are in local.
  # This option doesn't affect DB download. You need to specify "skip-update" as well as "offline-scan" in an air-gapped environment.
  offline_scan: false
  #
  # Comma-separated list of what security issues to detect. Possible values are `vuln`, `config` and `secret`. Defaults to `vuln`.
  security_check: vuln
  #
  # insecure The flag to skip verifying registry certificate
  insecure: true
  # github_token The GitHub access token to download Trivy DB
  #
  # Anonymous downloads from GitHub are subject to the limit of 60 requests per hour. Normally such rate limit is enough
  # for production operations. If, for any reason, it's not enough, you could increase the rate limit to 5000
  # requests per hour by specifying the GitHub access token. For more details on GitHub rate limiting please consult
  # https://docs.github.com/rest/overview/resources-in-the-rest-api#rate-limiting
  #
  # You can create a GitHub token by following the instructions in
  # https://help.github.com/en/github/authenticating-to-github/creating-a-personal-access-token-for-the-command-line
  #
  # github_token: xxx

jobservice:
  # Maximum number of job workers in job service
  max_job_workers: 10
  # The jobLoggers backend name, only support "STD_OUTPUT", "FILE" and/or "DB"
  job_loggers:
    - STD_OUTPUT
    - FILE
    # - DB
  # The jobLogger sweeper duration (ignored if `jobLogger` is `stdout`)
  logger_sweeper_duration: 1 #days

notification:
  # Maximum retry count for webhook job
  webhook_job_max_retry: 3
  # HTTP client timeout for webhook job
  webhook_job_http_client_timeout: 3 #seconds

# Log configurations
log:
  # options are debug, info, warning, error, fatal
  level: info
  # configs for logs in local storage
  local:
    # Log files are rotated log_rotate_count times before being removed. If count is 0, old versions are removed rather than rotated.
    rotate_count: 50
    # Log files are rotated only if they grow bigger than log_rotate_size bytes. If size is followed by k, the size is assumed to be in kilobytes.
    # If the M is used, the size is in megabytes, and if G is used, the size is in gigabytes. So size 100, size 100k, size 100M and size 100G
    # are all valid.
    rotate_size: 200M
    # The directory on your host that store log
    location: /var/log/harbor

  # Uncomment following lines to enable external syslog endpoint.
  # external_endpoint:
  #   # protocol used to transmit log to external endpoint, options is tcp or udp
  #   protocol: tcp
  #   # The host of external endpoint
  #   host: localhost
  #   # Port of external endpoint
  #   port: 5140

#This attribute is for migrator to detect the version of the .cfg file, DO NOT MODIFY!
_version: 2.9.0

# Uncomment external_database if using external database.
# external_database:
#   harbor:
#     host: harbor_db_host
#     port: harbor_db_port
#     db_name: harbor_db_name
#     username: harbor_db_username
#     password: harbor_db_password
#     ssl_mode: disable
#     max_idle_conns: 2
#     max_open_conns: 0

# Uncomment redis if need to customize redis db
# redis:
#   # db_index 0 is for core, it's unchangeable
#   # registry_db_index: 1
#   # jobservice_db_index: 2
#   # trivy_db_index: 5
#   # it's optional, the db for harbor business misc, by default is 0, uncomment it if you want to change it.
#   # harbor_db_index: 6
#   # it's optional, the db for harbor cache layer, by default is 0, uncomment it if you want to change it.
#   # cache_db_index: 7

# Uncomment redis if need to customize redis db
# redis:
#   # db_index 0 is for core, it's unchangeable
#   # registry_db_index: 1
#   # jobservice_db_index: 2
#   # trivy_db_index: 5
#   # it's optional, the db for harbor business misc, by default is 0, uncomment it if you want to change it.
#   # harbor_db_index: 6
#   # it's optional, the db for harbor cache layer, by default is 0, uncomment it if you want to change it.
#   # cache_layer_db_index: 7

# Uncomment external_redis if using external Redis server
# external_redis:
#   # support redis, redis+sentinel
#   # host for redis: <host_redis>:<port_redis>
#   # host for redis+sentinel:
#   #  <host_sentinel1>:<port_sentinel1>,<host_sentinel2>:<port_sentinel2>,<host_sentinel3>:<port_sentinel3>
#   host: redis:6379
#   password:
#   # Redis AUTH command was extended in Redis 6, it is possible to use it in the two-arguments AUTH <username> <password> form.
#   # there's a known issue when using external redis username ref:https://github.com/goharbor/harbor/issues/18892
#   # if you care about the image pull/push performance, please refer to this https://github.com/goharbor/harbor/wiki/Harbor-FAQs#external-redis-username-password-usage
#   # username:
#   # sentinel_master_set must be set to support redis+sentinel
#   #sentinel_master_set:
#   # db_index 0 is for core, it's unchangeable
#   registry_db_index: 1
#   jobservice_db_index: 2
#   trivy_db_index: 5
#   idle_timeout_seconds: 30
#   # it's optional, the db for harbor business misc, by default is 0, uncomment it if you want to change it.
#   # harbor_db_index: 6
#   # it's optional, the db for harbor cache layer, by default is 0, uncomment it if you want to change it.
#   # cache_layer_db_index: 7

# Uncomment uaa for trusting the certificate of uaa instance that is hosted via self-signed cert.
# uaa:
#   ca_file: /path/to/ca

# Global proxy
# Config http proxy for components, e.g. http://my.proxy.com:3128
# Components doesn't need to connect to each others via http proxy.
# Remove component from `components` array if want disable proxy
# for it. If you want use proxy for replication, MUST enable proxy
# for core and jobservice, and set `http_proxy` and `https_proxy`.
# Add domain to the `no_proxy` field, when you want disable proxy
# for some special registry.
proxy:
  http_proxy:
  https_proxy:
  no_proxy:
  components:
    - core
    - jobservice
    - trivy

# metric:
#   enabled: false
#   port: 9090
#   path: /metrics

# Trace related config
# only can enable one trace provider(jaeger or otel) at the same time,
# and when using jaeger as provider, can only enable it with agent mode or collector mode.
# if using jaeger collector mode, uncomment endpoint and uncomment username, password if needed
# if using jaeger agetn mode uncomment agent_host and agent_port
# trace:
#   enabled: true
#   # set sample_rate to 1 if you wanna sampling 100% of trace data; set 0.5 if you wanna sampling 50% of trace data, and so forth
#   sample_rate: 1
#   # # namespace used to differenciate different harbor services
#   # namespace:
#   # # attributes is a key value dict contains user defined attributes used to initialize trace provider
#   # attributes:
#   #   application: harbor
#   # # jaeger should be 1.26 or newer.
#   # jaeger:
#   #   endpoint: http://hostname:14268/api/traces
#   #   username:
#   #   password:
#   #   agent_host: hostname
#   #   # export trace data by jaeger.thrift in compact mode
#   #   agent_port: 6831
#   # otel:
#   #   endpoint: hostname:4318
#   #   url_path: /v1/traces
#   #   compression: false
#   #   insecure: true
#   #   # timeout is in seconds
#   #   timeout: 10

# Enable purge _upload directories
upload_purging:
  enabled: true
  # remove files in _upload directories which exist for a period of time, default is one week.
  age: 168h
  # the interval of the purge operations
  interval: 24h
  dryrun: false

# Cache layer configurations
# If this feature enabled, harbor will cache the resource
# `project/project_metadata/repository/artifact/manifest` in the redis
# which can especially help to improve the performance of high concurrent
# manifest pulling.
# NOTICE
# If you are deploying Harbor in HA mode, make sure that all the harbor
# instances have the same behaviour, all with caching enabled or disabled,
# otherwise it can lead to potential data inconsistency.
cache:
  # not enabled by default
  enabled: false
  # keep cache for one day by default
  expire_hours: 24

# Harbor core configurations
# Uncomment to enable the following harbor core related configuration items.
# core:
#   # The provider for updating project quota(usage), there are 2 options, redis or db,
#   # by default is implemented by db but you can switch the updation via redis which
#   # can improve the performance of high concurrent pushing to the same project,
#   # and reduce the database connections spike and occupies.
#   # By redis will bring up some delay for quota usage updation for display, so only
#   # suggest switch provider to redis if you were ran into the db connections spike aroud
#   # the scenario of high concurrent pushing to same project, no improvment for other scenes.
#   quota_update_provider: redis # Or db
Отредактируйте файл
harbor.yml:заполните
hostnameкорректным адресом, для которого были сгенерированы сертификаты в разделе Генерация сертификатов для реестра образов выше;в секции
httpsзаполните полный путь до каталогаcerts, которая была создана скриптомharbor_certs.shиз шага 3 в разделе Генерация сертификатов для реестра образов выше, для полейcertificateиprivate_key;поменяйте преднастроенный пароль администратора (по умолчанию
<harbor-admin-password>).
Создайте в каталоге
harborскриптharbor_registry_install.sh:harbor_registry_install.sh
#!/bin/bash
set -e

CONTAINER_ENGINE="podman"

while [[ "$#" -gt 0 ]]; do
    case $1 in
        --container-engine)
            if [[ -n "$2" ]]; then
                CONTAINER_ENGINE="$2"
                shift
            else
                echo "Ошибка: Для --container-engine не указано значение."
                exit 1
            fi
            ;;
        *)
            echo "Неизвестный параметр: $1"
            exit 1
            ;;
    esac
    shift
done

if ! command -v "$CONTAINER_ENGINE" &> /dev/null; then
    echo "Ошибка: Команда '$CONTAINER_ENGINE' не найдена. Убедитесь, что она установлена."
    exit 1
fi

echo "Используется контейнерный движок: $CONTAINER_ENGINE"

if [[ -n "$HARBOR_BUNDLE_DIR" ]]; then
    harbor_prepare_path=$HARBOR_BUNDLE_DIR
else
    harbor_prepare_path="$( cd "$(dirname "$0")" ; pwd -P )"
fi
echo "Подготовительный каталог: ${harbor_prepare_path}"

rm -rf ${harbor_prepare_path}/input

mkdir -p ${harbor_prepare_path}/input
input_dir=${harbor_prepare_path}/input

if [[ ! "$1" =~ ^\-\- ]] && [ -f "$1" ]
then
    cp $1 $input_dir/harbor.yml
    shift
else
    if [ -f "${harbor_prepare_path}/harbor.yml" ];then
        cp ${harbor_prepare_path}/harbor.yml $input_dir/harbor.yml
    else
        echo "Не найден конфигурационный файл ${harbor_prepare_path}/harbor.yml"
        exit 1
    fi
fi

data_path=$(grep '^[^#]*data_volume:' $input_dir/harbor.yml | awk '{print $NF}')
echo "Каталог с данными: ${data_path}"

mkdir -p $data_path

previous_secretkey_path=/data/secretkey
previous_defaultalias_path=/data/defaultalias

if [ -f $previous_secretkey_path ]; then
    mkdir -p $data_path/secret/keys
    mv $previous_secretkey_path $data_path/secret/keys
fi
if [ -f $previous_defaultalias_path ]; then
    mkdir -p $data_path/secret/keys
    mv $previous_defaultalias_path $data_path/secret/keys
fi


secret_dir=${data_path}/secret
config_dir=$harbor_prepare_path/common/config

mkdir -p $secret_dir
mkdir -p $config_dir

$CONTAINER_ENGINE run --rm -v $input_dir:/input \
                    -v $data_path:/data \
                    -v $harbor_prepare_path:/compose_location \
                    -v $config_dir:/config \
                    -v /:/hostfs \
                    --privileged \
                    docker.io/goharbor/prepare:v2.9.3 prepare

echo "Удаление подготовительного каталога"
rm -rf ${harbor_prepare_path}/input

sed -i 's|goharbor|docker.io/goharbor|g' docker-compose.yml
sed -i 's|"syslog"|"journald"|g' docker-compose.yml
sed -i '/syslog-address:/d' docker-compose.yml

sudo chmod -R 777 ./data_harbor/database
sudo chmod -R 777 ./data_harbor/redis

mkdir ${data_path}/cert
sudo cp certs/* ${data_path}/cert/
sudo chown -R 10000:10000 ${data_path}/cert/
sudo chmod -R 777 ${data_path}/cert/

echo "Запуск Harbor"
#sudo podman-compose up -d
Сделайте файл исполняемым:
chmod +x harbor_registry_install.shУстановите реестр образов, запустив скрипт
harbor_registry_install.sh:./harbor_registry_install.sh --container-engine <docker|podman>Для запуска реестра образов выполните команду:
<docker|podman>-compose up -dДля настройки автозапуска Harbor создайте системную службу
harbor.service:vi /etc/systemd/system/harbor.serviceПример настройки:
[Unit] Description=harbor After=network.target [Service] Type=oneshot RemainAfterExit=yes ExecStart=/usr/local/bin/podman-compose -f /root/harbor/docker-compose.yml up -d ExecStop=/usr/local/bin/podman-compose -f /root/harbor/docker-compose.yml down Restart=on-failure [Install] WantedBy=default.target/root/harbor/docker-compose.yml- пример пути расположения файлаdocker-compose.yml. При необходимости укажите иной каталог для установки.Добавьте службу в автозапуск с помощью последовательности команд:
активируйте службу
harbor.service:
systemctl enable harbor.serviceперезагрузите демоны:
systemctl daemon-reloadзапустите службу
harbor.service:
systemctl start harbor.serviceПроверьте состояние службы:
systemctl status harbor.serviceПример вывода команды:
● harbor.service - harbor
     Loaded: loaded (/etc/systemd/system/harbor.service; enabled; preset: disabled)
     Active: active (exited) since Fri 2025-04-25 11:53:57 MSK; 2min 6s ago
    Process: 833 ExecStart=/usr/local/bin/podman-compose -f /root/harbor/docker-compose.yml up -d (code=exited, status=0/SUCCESS)
   Main PID: 833 (code=exited, status=0/SUCCESS)
Валидация установки реестра образов#
Выполните sudo <docker|podman> compose ps и убедитесь, что все контейнеры запущены, рестартов нет:
<docker|podman> compose ps
Пользовательский интерфейс Harbor будет доступен в браузере по адресу, который был указан в harbor.yml, например https://registry.da-cluster.domain.ru.
Создание проекта для образов#
Зайдите в пользовательский интерфейс Harbor под учетной записью администратора и создайте проект
dapp: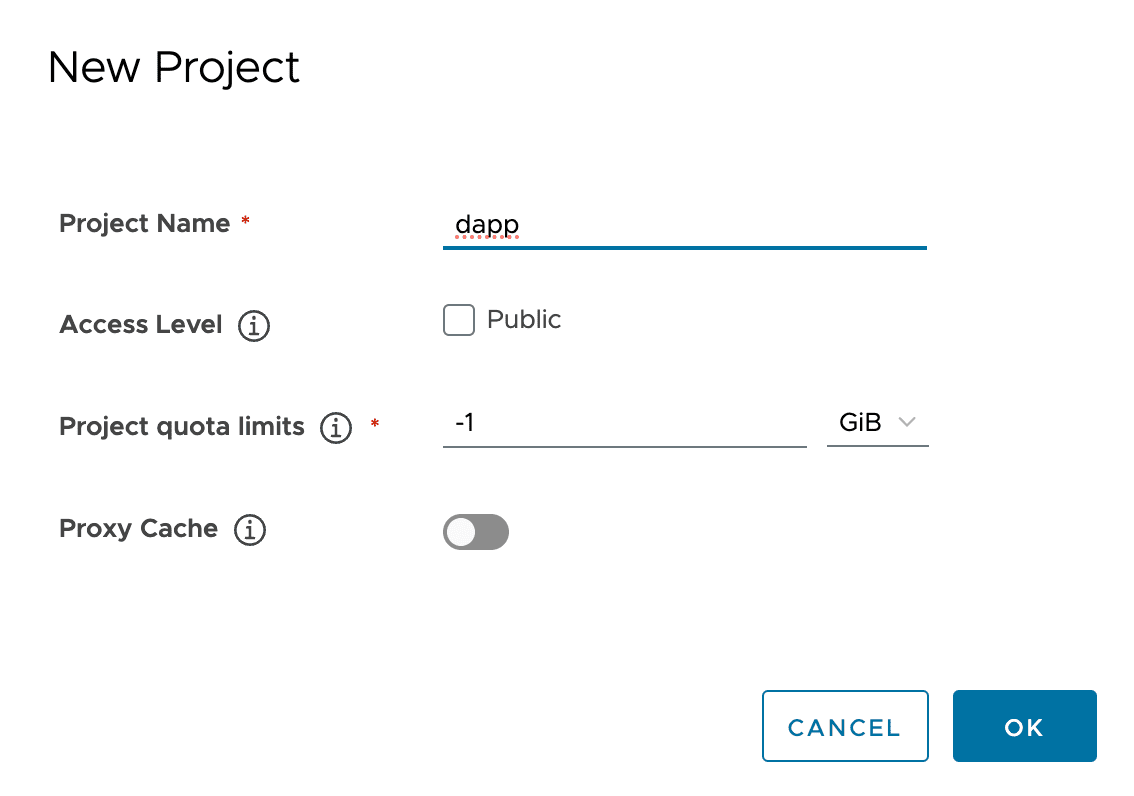
Выполните вход в созданный реестр. Логин (
Username) - этоadmin, пароль установлен вharbor.yml, полеharbor_admin_password:podman login harbor.bootstrap.domain.ru Username: admin Password: Login Succeeded!
Создание RPM-репозитория#
Пакеты DropApp#
Важно
selinux должен быть отключен командой sudo setenforce 0.
В разделе Распаковка дистрибутивов был распакован архив с RPM-репозиторием и получены два каталога с пакетами DropApp собранными для SberLinux 8 и 9 поколения:
rpms/K8S-k8sc-rpms-<version>-<distrib_number>-SBEL9-distrib.zip;rpms/K8S-k8sc-rpms-<version>-<distrib_number>-SBEL8-distrib.zip.
Для создания RPM-репозитория выполните следующие шаги:
Создайте файл
rpm_repo_install.sh:rpm_repo_install.sh
#!/bin/bash

# Проверка прав доступа
if [[ $EUID -ne 0 ]]; then
   echo "Этот скрипт должен быть запущен с правами root (sudo)."
   exit 1
fi

# Функция вывода справки
usage() {
    echo "Использование: $0 --src-dir <путь_к_каталогу_с_RPM_пакетами> --dest-dir <внутренний_каталог>"
    exit 1
}

# Проверка состояния SELinux
if [[ $(getenforce) == "Enabled" ]]; then
    echo "SELinux включен. Предварительно выключите SELinux."
    exit 1
fi

# Парсинг параметров
while [[ "$#" -gt 0 ]]; do
    case $1 in
        --src-dir)
            src_dir="$2"
            shift
            ;;
        --dest-dir)
            dest_dir="$2"
            shift
            ;;
        *)
            echo "Неизвестный параметр: $1"
            usage
            ;;
    esac
    shift
done

# Проверка наличия обязательных параметров
if [[ -z "$src_dir" || -z "$dest_dir" ]]; then
    usage
fi

# Проверка существования исходного каталога с RPM пакетами
if [[ ! -d "$src_dir" ]]; then
    echo "Указанный исходный каталог не существует: $src_dir"
    exit 1
fi

# Создание целевого каталога внутри репозитория
repo_root="/usr/share/nginx/html"
repo_dest_dir="$repo_root/$dest_dir"

echo "Создание целевого каталога: $repo_dest_dir..."
mkdir -p "$repo_dest_dir"

# Копирование RPM пакетов в целевой каталог
echo "Копирование RPM пакетов из $src_dir в $repo_dest_dir..."
cp -r "$src_dir"/* "$repo_dest_dir/"

# Установка необходимых пакетов
echo "Установка необходимых пакетов..."
yum install -y createrepo nginx

# Создание RPM репозитория
echo "Создание RPM репозитория в каталоге: $repo_dest_dir..."
createrepo "$repo_dest_dir"

# Настройка Nginx для работы на порту 8080
echo "Настройка Nginx..."
cat <<EOF > /etc/nginx/nginx.conf
user nginx;
worker_processes auto;
error_log /var/log/nginx/error.log;
pid /run/nginx.pid;

events {
    worker_connections 1024;
}

http {
    include       /etc/nginx/mime.types;
    default_type  application/octet-stream;

    server {
        listen       8080;
        server_name  localhost;

        location / {
            root   $repo_root;
            autoindex on;
            autoindex_exact_size off;
        }
    }
}
EOF

# Запуск и включение автозапуска Nginx
echo "Запуск Nginx..."
systemctl start nginx
systemctl enable nginx

# Открытие порта 8080 в файрволе (только если firewalld запущен)
if systemctl is-active --quiet firewalld; then
    echo "Открытие порта 8080 в файрволе..."
    firewall-cmd --zone=public --add-port=8080/tcp --permanent
    firewall-cmd --reload
else
    echo "Firewalld не запущен. Пропустить настройку firewall."
fi

# Получение IP-адреса сервера
server_ip=$(hostname -I | awk '{print $1}')
if [[ -z "$server_ip" ]]; then
    echo "Не удалось определить IP-адрес сервера."
    exit 1
fi

# Вывод инструкций по настройке .repo файла
echo "RPM репозиторий успешно создан и доступен по адресу:"
echo "http://$server_ip:8080/$dest_dir/"
echo ""
echo "Добавьте следующий блок в ваш .repo файл:"
echo ""
cat <<EOF
[$dest_dir]
name=$dest_dir Repository
baseurl=http://$server_ip:8080/$dest_dir
enabled=1
gpgcheck=0
EOF
Важно
Скрипт устанавливает пакеты
createrepoиnginx, доступные в репозиториях SberLinux.Сделайте файл исполняемым:
chmod +x rpm_repo_install.shЗапустите скрипт, передав ему путь до разархивированного каталога:
./rpm_repo_install.sh --src-dir ./rpms/rpms-sbel9 --dest-dir "dapp-<version>-sbel9"
Пакеты SberLinux#
Пакеты DropApp имеют зависимости от пакетов из репозиториев SberLinux, поэтому необходимо добавить репозиторий SberLinux в онлайн-репозиторий, который был создан в разделе Пакеты DropApp выше.
Для этого выполните следующие шаги:
Скачайте из репозиториев SberLinux ISO-файл и смонтируйте его на машине администратора:
mkdir /mnt/disk
mount -t iso9660 /dev/sr0 /mnt/disk
Скопируйте репозитории BaseOS и AppStream в созданный RPM-репозиторий, используя скрипт
rpm_repo_install.sh:./rpm_repo_install.sh --src-dir /mnt/disk/BaseOS --dest-dir sbel-<version>-baseos ./rpm_repo_install.sh --src-dir /mnt/disk/AppStream --dest-dir sbel-<version>-appstream
После выполнения шагов репозитории DropApp и SberLinux доступны по адресам:
http://<ip-address-rpm-repo>:8080/dapp-<version>-sbel9;http://<ip-address-rpm-repo>:8080/sbel-<version>-baseos.
Загрузка образов DropApp в реестр#
Dactl при загрузке образов использует утилиту skopeo.
Установите skopeo, например, следующей командой:
dnf install skopeo
Примечание
Инструмент skopeo входит в состав продукта SberLinux.
Образы MGMT#
Загрузите образы из каталога images_mgmt в созданный реестр, используя Dactl:
./dactl/dactl copy images --src ./images-mgmt --dest registry.da-cluster.domain.ru/dapp
Образы K8SC#
Загрузите образы из каталога images_mgmt в созданный реестр, используя Dactl:
./dactl/dactl copy images --src ./images --dest registry.da-cluster.domain.ru/dapp
Результат подготовки окружения#
Результатом подготовки окружения является:
настроенные DNS-записи;
выделенные IP-адреса;
реестр образов Harbor;
RPM-репозиторий.
Примечание
Дальнейшая настройка и установка кластера DropApp производится с этой машины